I’ve got three funny St. Patrick’s Day shirts for you here! Also included are step by step instructions for cricut infusible ink.
Each year I make a new funny St. Patrick’s Day shirt, this one was one of my favorites and this one is more for a St. Patrick’s Day onesie. I always use my Cricut when I make tee shirts so be sure to check out all those projects!
I wanted my son to wear something fun for St. Patrick’s day BUT I wanted to to last longer than just St. Patrick’s day too. I’ll also show you how to do Cricut Infusible Ink on these St. Patrick’s Day shirts!
About These St Patricks Day Shirts
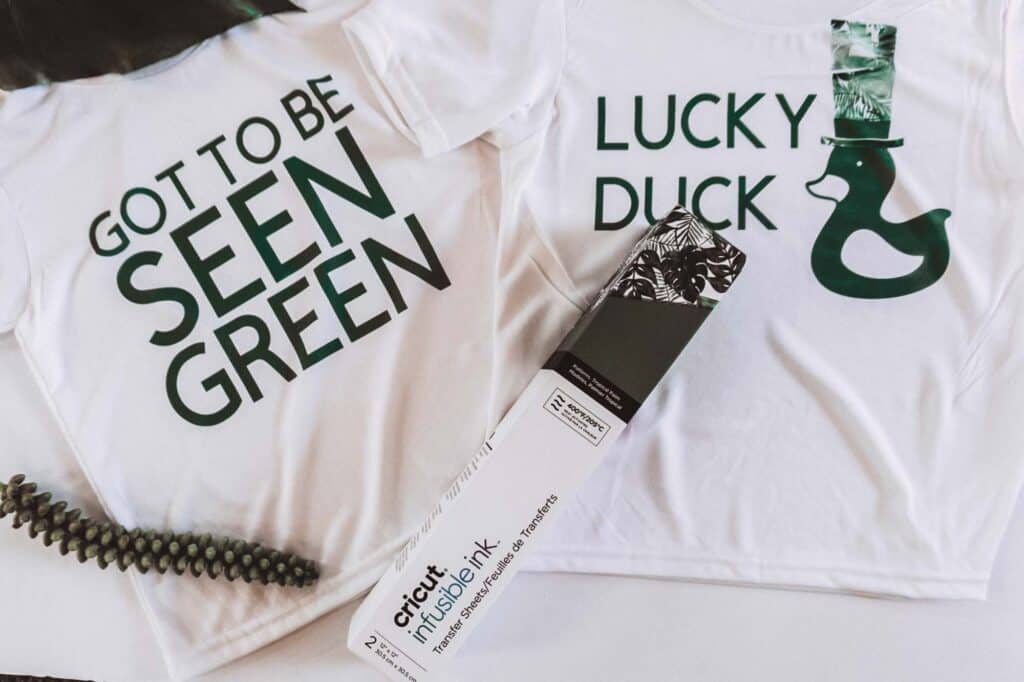
First of all.. “Got to be seen green” is a reference to a show. If you got it on the first look, you are already ahead of my family who GREW UP on this movie!! The Wiz!! I’ll link the video for your enjoyment here.
The lucky duck one is pretty self explanatory. I added a little touch of the palms on the hat. Only because they had that pattern in the Infusible Ink box and I loved it so much!
How to Make Cricut Infusible Ink Shirts
You will need a polyester shirt for these St. Patrick’s Day shirts. I did a post about if you really need Cricut Infusible Ink blanks where you can see why cotton doesn’t work well. However since this post I have learned that any fully polyester shirt will work ok! I really like the ones I get from Jiffy Shirts or Amazon.
Funny St. Patrick's Day Shirts
I've got three funny St. Patrick's Day shirts for you here! Also included are step by step instructions for cricut infusible ink.
Materials
- Polyester Shirts
- Cricut Infusible Ink
Tools
- Cricut
- Latex Gloves
- Butcher Paper
- Cardstock
- EasyPress 2
Instructions
- Cut out the cut files provided in the post using Infusible Ink Settings. Be sure to have the shiny side down and your image mirrored!
- After image is cut, use your latex gloves to weed the pattern with your fingers. Don't use a weeding tool
- Heat up your EasyPress 2 to 385 degrees.
- Place the card stock within in the shirt, place the infusible ink on the top of the shirt with the ink side down and put the butcher paper on top of it.
- Place your EasyPress on top of the shirt for 40 seconds.
- Allow the ink to completely cool. Do not remove the materials for at least 2 minutes. This will allow the color to fully saturate.
Recommended Products
As an Amazon Associate and member of other affiliate programs, I earn from qualifying purchases.