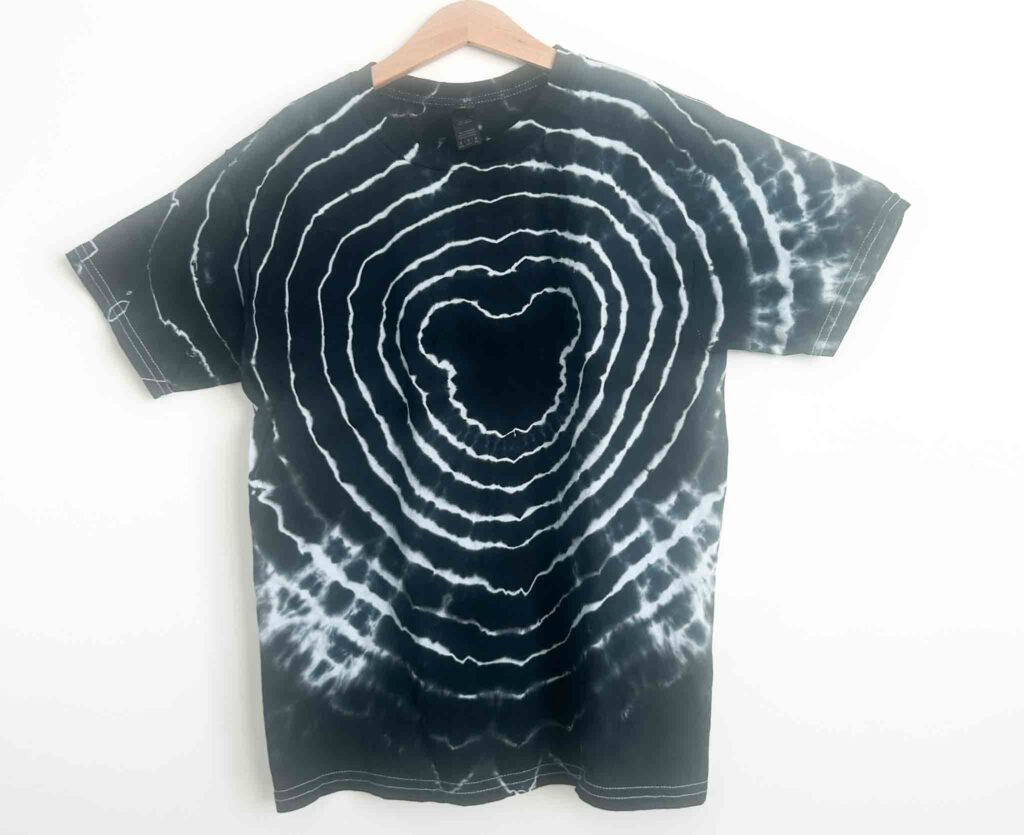
If you’ve been searching for a Mickey tie dye shirt that actually looks handmade and special, the good news is you can make one yourself in an afternoon. This DIY uses a half-Mickey template, an accordion fold, and a single bullseye scrunch to create a bold black-on-white Mickey Mouse tie dye shirt with a fun bullseye trailing off to the sides.
This is a beginner-friendly tutorial. If you can fold a shirt in half and trace a shape, you can absolutely pull this off. Watch the full video walkthrough below, then keep scrolling for the step-by-step instructions, materials list, and a few tips I learned the hard way so you don’t have to.
What You’ll Need
Before you start folding, gather your supplies. Most of these I link to in my Amazon storefront if you need a starting point.
- A 100% cotton T-shirt (pre-washed, then dampened)
- Half-Mickey template (grab the free printable in the link at the bottom of this post or here.)
- Crayola washable marker (other brands may not wash out, so stick with Crayola)
- Sinew and a sinew puller for tying
- Black liquid dye. I combined Jacquard Jet Black and Raven Black, but either one on its own works great
- A small funnel
- Squeeze bottle
- Plastic bag or wrap for curing
- Dawn dish soap (yes, really, it helps with the rinse out)
- Gloves and an old apron or work surface you don’t mind getting messy
A quick note on the black dye choice: black is one of the trickiest colors to work with because there are so many formulations and the rinse-out is no joke. I tested 17 different black liquid dyes side by side, so if you want to nerd out before you buy, head over to my black dye comparison post for the full breakdown.
Step 1: Find the Center and Fold Your Shirt
Lay your damp T-shirt flat on your work surface. Your shirt should be damp, not soaking wet. Fluffy and freshly out of the washer is too wet, so wring it out or let it air dry a bit first.
Grab the top and the bottom of the shirt and fold it in half so the front and back meet. You’re looking for that vertical center line down the middle of the shirt. That center line is where you’ll line up the flat edge of your half-Mickey template.
Smooth out any bunches or wrinkles before you move on.
Step 2: Trace the Half-Mickey Template
Place your half-Mickey template along the folded edge of the shirt. The flat side of the template should sit right on the fold so that when you tie and dye, the full Mickey head shape will appear when you unfold the shirt.
Trace around the template with your washable Crayola marker. Take your time on the curves, especially around the ears.
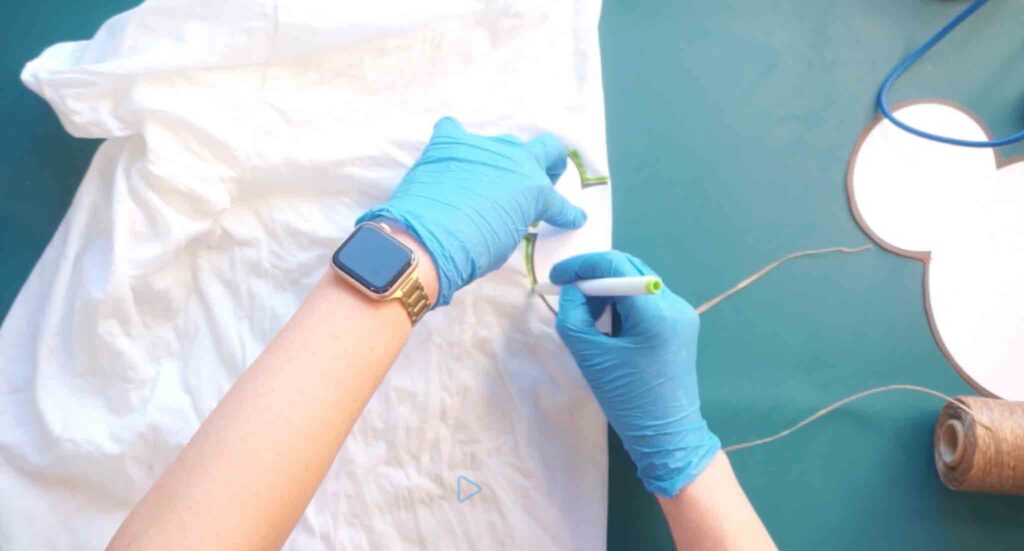
If you don’t have my template yet, you can sign up to get it sent straight to your inbox at the bottom of this post.
Step 3: Accordion Fold Along the Edge
This is the step that does the heavy lifting for getting a crisp Mickey shape. Starting at one end of your traced line, accordion fold the fabric along the edge, pleating it back and forth like a fan. The goal is to gather all that fabric into a tight stack right along the line you traced.
A few tips that make a real difference:
- As you go around the curves of the head and ears, try to keep the fold at the bottom (closest to the line). This is a trick I picked up from Mr. Tie-Dye, who has incredible tutorials on dyeing shapes if you want to go deeper.
- When you hit a tight bend, like the base of an ear, slow down and make smaller pleats so the line stays smooth.
- Don’t worry about perfection. Tie dye forgives a lot.
By the end, all of your traced line should be running along the top edge of an accordion-folded stack of fabric.
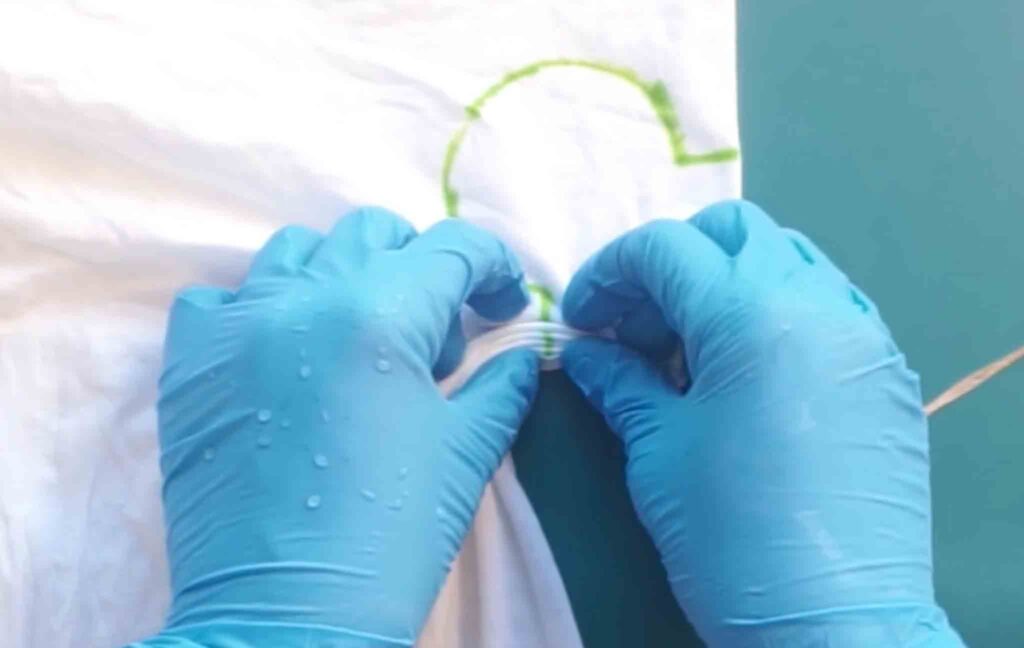
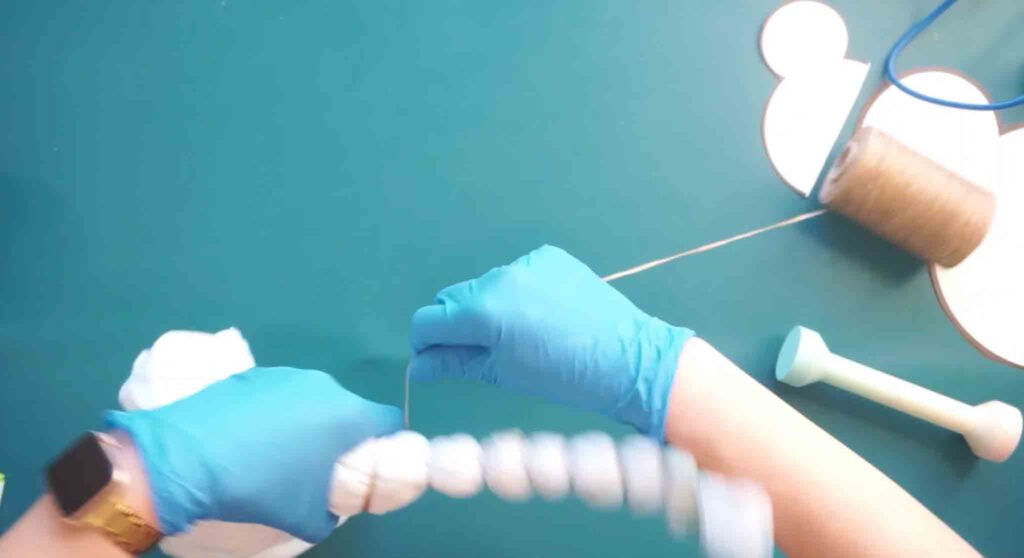
Step 4: Tie with Sinew
Now you’ll lock that fold in place with sinew. Wrap the sinew around the fabric right along the traced line, pulling tight as you go. I wrap mine three to five times and use a sinew puller to cinch it down.
Here’s what I’ve learned from testing:
- Two or three wraps will give you a thinner, less defined white Mickey line.
- Three to five wraps is the sweet spot for a bold, clean white silhouette.
- After about six wraps, you stop seeing a difference. So save your sinew.
Tie it off securely. This tied-off section is what will resist the dye and stay white, creating your Mickey shape.
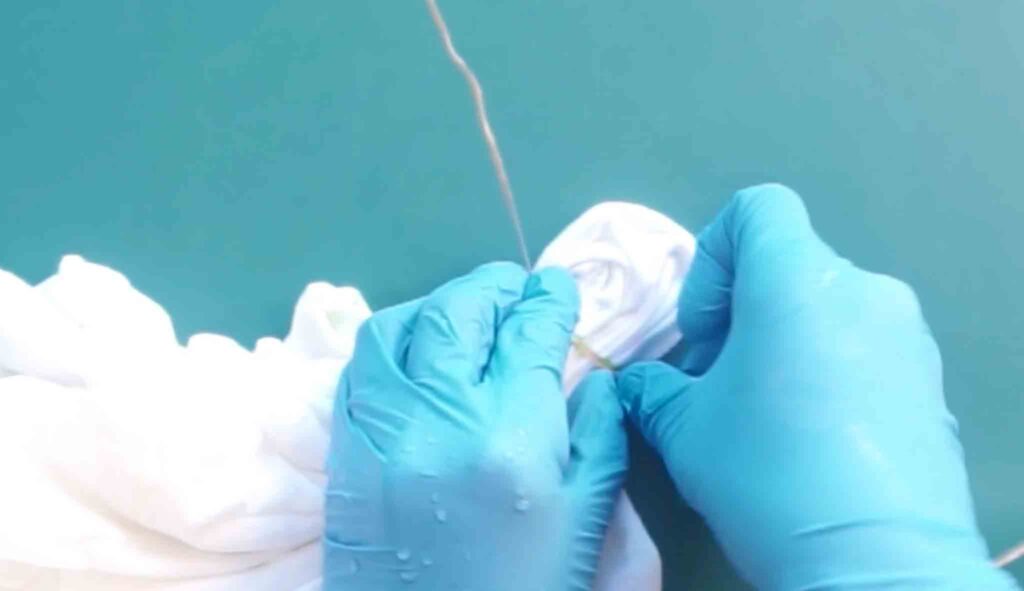
Step 5: Add the Bullseye
This is the fun creative twist. Instead of just dyeing the rest of the shirt one solid color, I added a bullseye trailing off the bottom of the Mickey shape.
Scrunch the fabric right where you tied off the Mickey, then tie another little nodule about an inch down. Do three to five wraps and pull tight. Keep going down the shirt, tying off little segments every inch or so. You can take it all the way to the bottom of the shirt or stop partway through, which is what I did.
Each tied segment will create another white ring in your bullseye, so the more you tie, the more rings you’ll get.
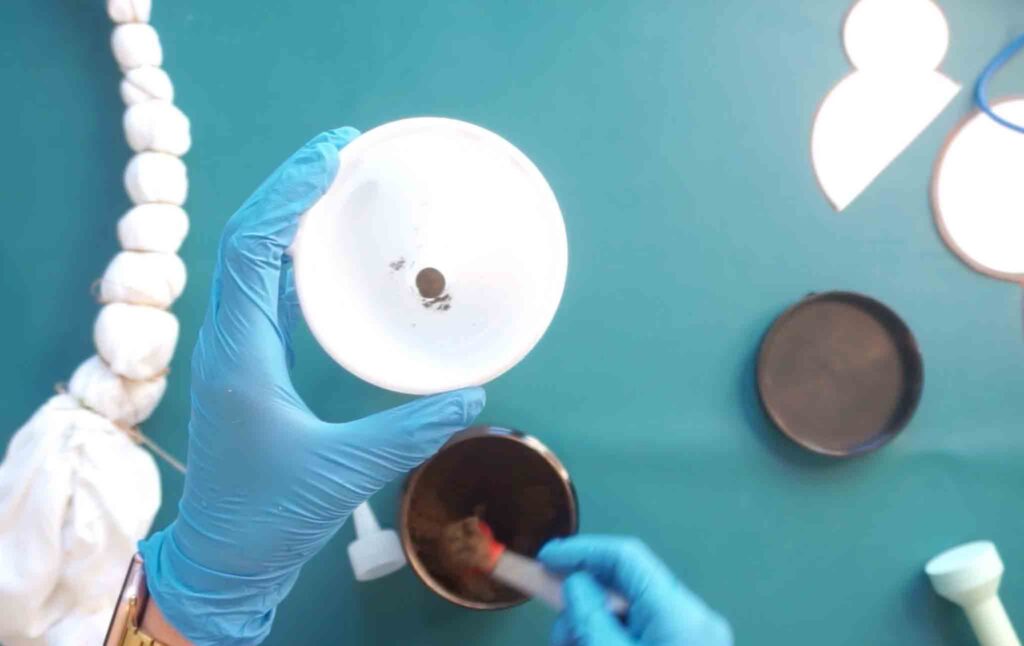
Step 6: Mix the Black Liquid Dye
Black liquid dye is concentrated, so a little goes a long way. My ratio is one teaspoon of dye per ounce of water.
For this shirt I mixed up 8 ounces, which means 8 teaspoons of dye. Honestly, I could have gotten away with 6 ounces, so adjust based on the size of your shirt.
For this batch, I combined two blacks:
- Jacquard Jet Black (a true, neutral black)
- Raven Black (the blackest of the blacks in my testing)
You absolutely don’t need to combine them. Either one on its own will give you a beautiful result. I just had a lot of both on hand and wanted to use them up.
Use a funnel to get the dye into your squeeze bottle without making a mess.
Step 7: Apply the Dye
Make sure your shirt is damp before you apply the dye. Damp fabric pulls dye in evenly. A bone-dry shirt will resist the dye and a soaking wet one will dilute it.
Squeeze the black dye over your tied shirt, getting good coverage everywhere except the tied-off Mickey shape and bullseye sections. Squish the fabric gently with gloved hands to push the dye down between the folds.
Flip the shirt over and dye the other side too. The dye won’t soak all the way through on its own, especially with all those folds, so this step is non-negotiable.
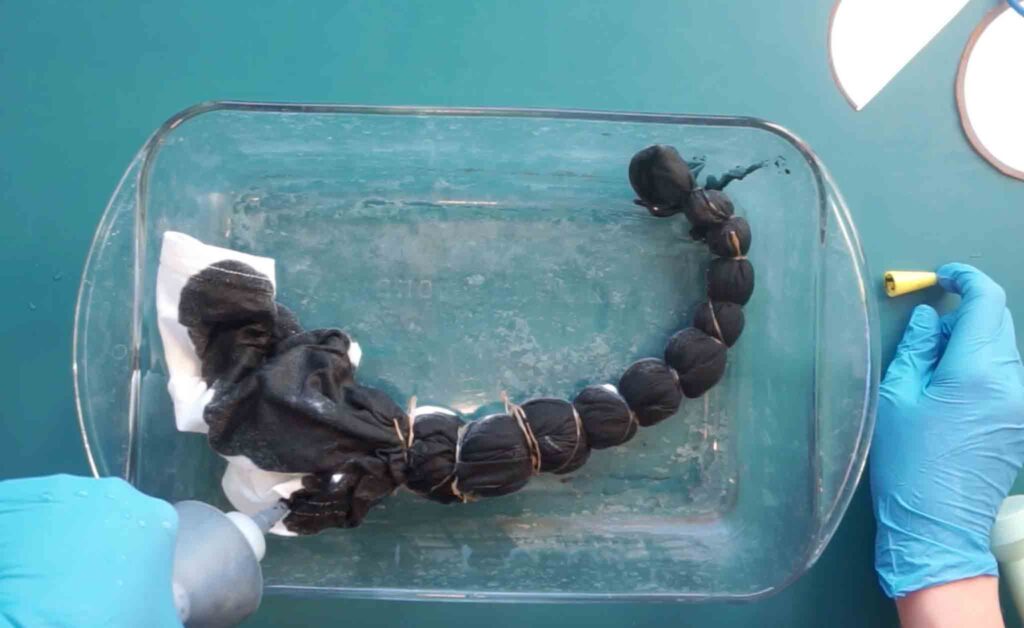
Step 8: Let It Cure
Pop your dyed shirt into a plastic bag or wrap it in plastic and let it cure.
I let mine sit for about 24 hours, but I’ve actually done a side-by-side test on this. Six hours of cure time gives you the same color saturation as 24 hours. So if you want to rinse it out the same day, six hours is plenty.
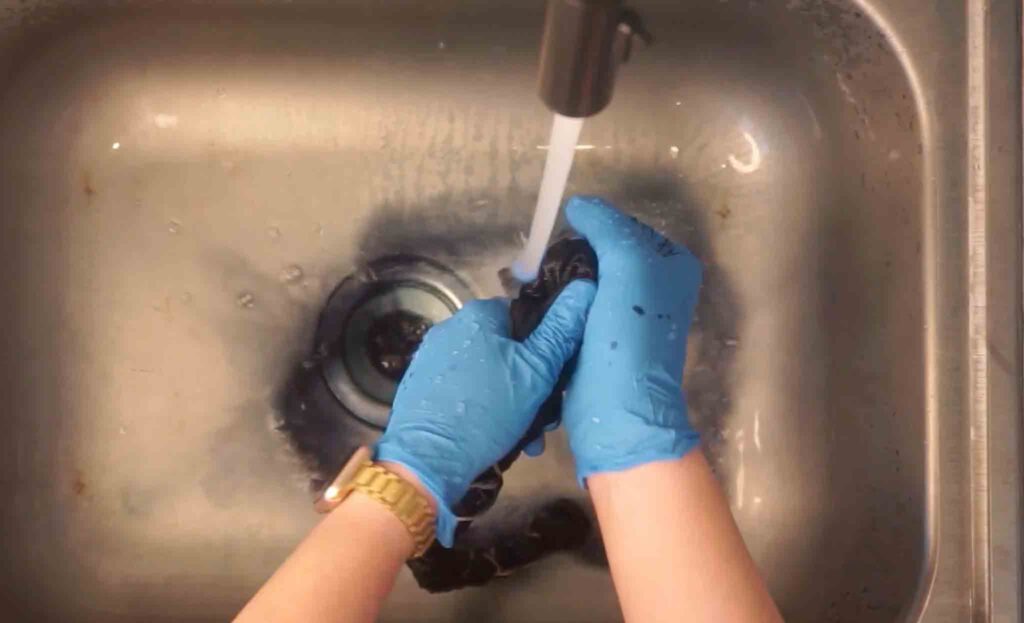
Step 9: Rinse Out (The Long Part)
Fair warning: rinsing out black dye takes a while. My rinse out for this shirt took 12 minutes of active rinsing. If you’ve never rinsed something for 12 minutes straight, just know that it feels like forever.
Here’s my rinse-out process for black liquid dye:
- Rinse in cool water with the shirt still tied. Keep going until the water runs mostly clear.
- Untie the shirt.
- Rinse in hot water.
- Wash the shirt with Dawn dish soap (this lifts excess dye that water alone won’t grab).
- Run it through a washing machine cycle on hot.
Alternate method for big batches: If you’re rinsing more than a couple shirts, chuck them tied into the washing machine and run a heavy cycle on cool water for the initial rinse. It’s much faster. The only downside is the white areas can come out slightly gray, but it’s barely noticeable. I’ve done both ways and the machine method is what I reach for when I’m batch dyeing.
A few honest notes on rinsing different colors:
- Black and red are the hardest colors to rinse out. Plan extra time.
- Turquoise is sneaky. It seems rinsed out, but boil-test it and you’ll find more dye still bleeding. (More on that in another post.)
Final Result
When you untie and unfold this shirt, you get a bold black background with a crisp white Mickey silhouette and a fun bullseye trailing down. The back of the shirt is mostly solid black, which I think looks cool but you could absolutely fold differently if you want a pattern on both sides.
A few honest notes on my finished shirt: the Mickey isn’t perfectly centered. The back is pretty plain. And you know what? That’s the charm of handmade. Every shirt you make will be one of a kind, and that’s the whole point.
Tips for Your Best Mickey Tie Dye Shirt
- Pre-wash your shirt. New shirts often have sizing on them that resists dye. A wash strips that off.
- Damp, not wet. I cannot say this enough. Damp fabric is the secret to even, vibrant color.
- More ties equals bolder lines. Three to five wraps of sinew is the sweet spot for crisp white shapes.
- Don’t skip the Dawn. It really does pull excess dye out faster than detergent alone.
- Black is hard. Red is harder. If this is your first liquid dye project, you might want to start with a single bright color before tackling black.
Want the Half-Mickey Template?
The free printable half-Mickey template I used in this tutorial is yours when you sign up for my email list.
You’ll also get folding tutorials, color combos, and behind-the-scenes from my dye studio dropped into your inbox.
Loved this project? Pin it for later, then check out my other Mickey and Disney-inspired tie dye tutorials. And if you’d rather buy a one-of-a-kind handmade tie dye piece than make your own, my Etsy shop has hand-dyed shirts and dresses ready to ship.


