If you have done even three minutes of tie dye party research, you have probably run across the Create Basics 18 bottle tie dye party tub at Walmart. It is the $10 tie dye party kit that shows up on every “what do I need for a tie dye party?” recommendation list, and I have always wondered how it actually holds up. So I bought one, swatched every color, and put it through three real projects to find out.
This is my honest review from a professional tie dyer’s perspective. I will cover what is in the kit, what the instructions actually tell you to do (and what they leave out), color swatches for all 18 bottles, three finished projects, the one pro tip that will make or break your results, and whether this kit is actually worth your money.
You can grab the same tub I tested here: Create Basics tie dye party tub at Walmart.
If you’re comparing different kits and shopping from Amazon, check out this review of the best tie dye kits here.
First impression: the packaging is funky
Before I even opened the tub, I had a small gripe. The whole thing was wrapped in cardboard and taped down, which is an odd way to package something that is already a sealed plastic tub. I am not sure what problem this packaging was solving. It is not a dealbreaker, but it was my first “huh, that’s weird” moment with the Create Basics tie dye party tub.

What is in the Create Basics 18 bottle tie dye party tub?
Once you peel the cardboard off and open the tub, here is what you get:
- 18 small squeeze bottles of dye in a wide range of colors
- A small packet with about 20 rubber bands
- One plastic tablecloth
- An instruction sheet
- A cardboard insert
For $10, the dye selection is genuinely impressive. Eighteen bottles is more than most kits at this price point, and the colors are bright and saturated. You are not going to run out of options.
Tie dye party tub instructions: what the kit tells you to do
The instructions that come inside the Create Basics tie dye party tub are pretty bare bones. Here is what they cover:
- Pre-wash your shirts (no fabric softener)
- Wet your fabric before dyeing
- Fold and band your shirt using one of three suggested folds
- Apply dye from the squeeze bottles
- Let the dye set, then rinse and wash
What is missing is what I noticed right away. The three suggested folds are text only with no photos, and there is no mention of resting times or how long to let the dye actually develop. If you have never tie dyed before, the included instructions will get you to a finished shirt, but probably not your best finished shirt.
If you want better results, here is what I would add to the kit instructions:
- Wring them out well so they are damp, not dripping
- Let your dyed shirts rest in a plastic bag for 8 to 24 hours before rinsing
- Rinse in cold water first (still banded), then wash in hot water with regular detergent
If you want photo-based fold instructions to use with this kit, my free ebook covers 12 of the most popular tie dye folds with pictures. Grab the free 12 folds ebook here.
The weird cardboard insert situation
Inside the tub there is a cardboard insert wedged in around the dye bottles. I am genuinely not sure why it is there. When the insert is in place, the bottles stand up fine. When you take it out (which you will, because you need to get to the bottles), all the bottles fall over.
It would have been simpler to just make the tub a little smaller so the bottles fit snugly without needing a cardboard support. I get the sense that this kit was not really designed to be reused. Maybe you could get a week out of it before the tub becomes more annoying than helpful.
Color swatches: every color in the Create Basics tie dye party tub
The first thing I always do with a new dye kit is swatch every color on white fabric so I can see what I am actually working with. I laid every bottle out on two tea towels and compared them side by side.
The colors are vibrant. Honestly, there is a bigger selection of colors than you would ever need for a single party. Some of the colors are very close to each other (a couple of pinks, a couple of teals), but the range is solid. For $10, this is the most generous part of the kit.
Project 1: The classic heart shirt
I always start with a heart at tie dye parties because kids love them and adults love them too. There is just something about a heart shirt that makes everyone smile.
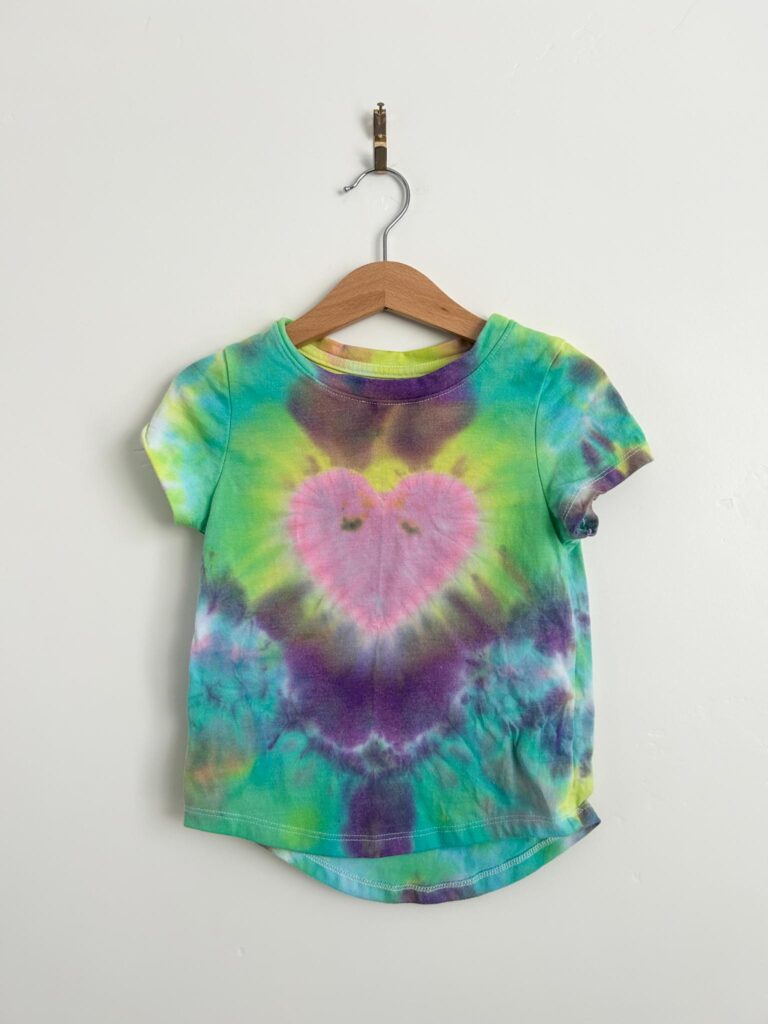
For this fold, you draw half a heart on the folded edge of the shirt, then accordion fold along that line. Rubber band tightly to hold the shape. I also banded the outer edge of the shirt to create some pattern in the background.
The rubber bands that come in the Create Basics kit are actually pretty good quality, so bonus points there. I dyed the heart pink and then used teal, purple, green, and yellow on the rest of the shirt.
Want a slower walkthrough of the heart fold? Watch the heart tie dye tutorial here
Project 2: The classic spiral
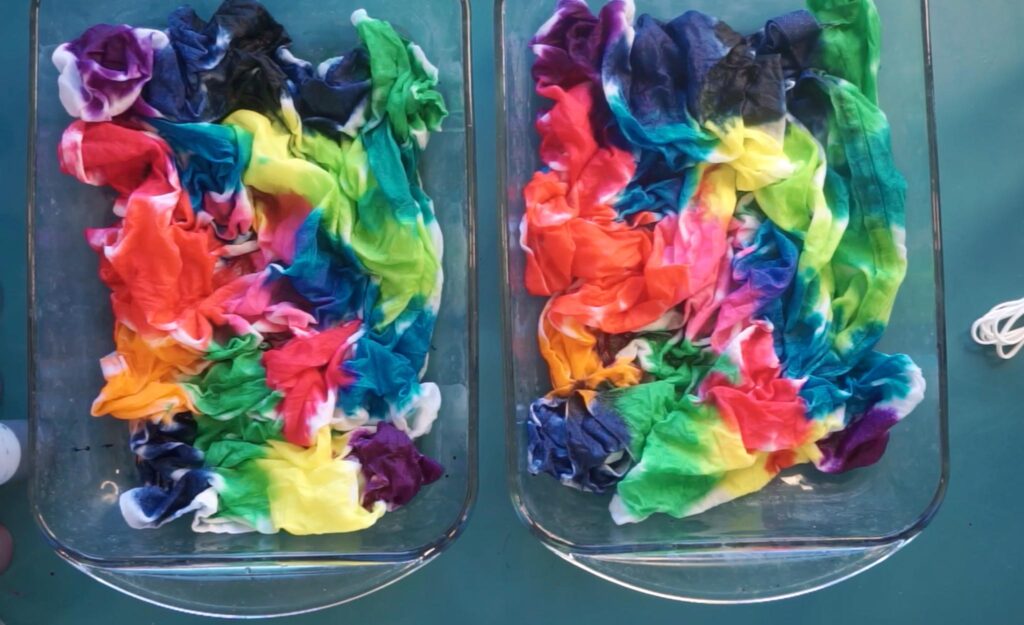
You cannot review a tie dye kit without doing a spiral. Pinch the center of the shirt, twist it flat against your work surface (do not lift it up as you twist), and band it into wedges.
I used every single color from the kit on this one, doing a different color in each wedge. The colors distributed beautifully, and I did not get much muddiness where they met. That tells me the formulation is well balanced for a budget kit.

Project 3: The bullseye (and where I hit a problem)
The bullseye is the simplest fold of the three. You pinch the front center of the shirt, pull straight up, and band it into sections.
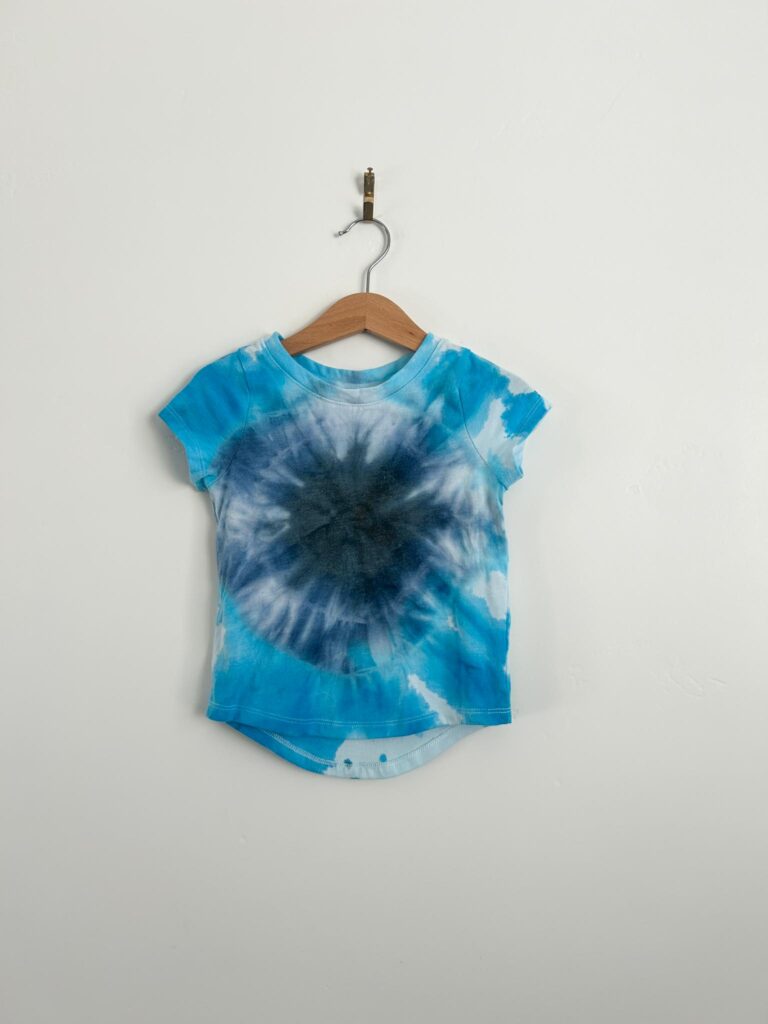
This is where I ran into trouble. The dye was not absorbing properly. I would squeeze the bottle and watch the color bead up on the fabric instead of soaking in. That was my signal that something was off, and it led directly into my biggest tip for using this kit.
How to use the tie dye party tub for best results
With some dye kits, you can get away with dyeing dry fabric. With the Create Basics tie dye party tub, you really cannot. The dye just sits on the surface and beads up.
The fix is simple. Before you fold, wet your shirt, then wring it out well. You want it damp, not sopping wet. Damp fabric absorbs dye evenly and lets the color spread into the folds the way it should.

Once I made sure my shirts were damp, the rest of the bullseye dyed beautifully. I flipped each project over and dyed the back too, because dye does not soak through dense folds on its own.
Final results revealed
After the dye rested and the shirts were washed, here is how each one turned out:
- Spiral: classic rainbow, clean color separation
- Heart: pink heart with vibrant teal, purple, green, and yellow background
- Scrunch (bonus easy fold): the simplest possible fold, still came out cute
- Bullseye: turned out fine once I got the damp fabric figured out, but it is my least favorite of the four results
Can you use the Create Basics tie dye party tub on colored shirts?
Short answer: yes, but with a caveat. Tie dye color sits on top of whatever color is already there, so dark shirts will mute or change the dye colors. A yellow shirt with blue dye will look green. A black shirt with bright dyes will barely show the colors at all.
If you want the dye to show on a dark shirt, you would need to bleach or reverse tie dye it first to lift the color, then apply your dyes. Here is my reverse tie dye tutorial if you want to try that with this kit.
For best results with the Create Basics kit, stick with white or very light pastel 100% cotton or rayon shirts.
Is the Create Basics 18 bottle tie dye party tub worth it?
Here is my honest verdict.
If you can get the Create Basics tie dye party tub for $15 or less, absolutely buy it. The color selection is huge, the dyes perform well as long as your fabric is damp, and the rubber bands included are decent quality. It is a great option for a small tie dye party or a one-time activity.
If it is priced over $20, skip it and invest in real fiber reactive dyes from a brand like Dharma or Jacquard. You will get better results and more dye for your money. Quick affiliate note: if you go the Jacquard route, my code ANNA gets you 20% off.
The Create Basics tub feels similar in quality to the Tulip kits you see at craft stores. I would give it a solid B grade. It is not the best dye on the market, but for $10, it does what it promises and the results are genuinely cute.
Grab the Create Basics tie dye party tub here: Create Basics tie dye party tub at Walmart.
Want more tie dye kit reviews?
I have reviewed almost every tie dye kit on the market. Here is the full playlist of kit reviews.
And if you are planning a tie dye party, my complete tie dye party guide is coming soon with everything from supplies to setup to wash cards for your guests.
Happy dyeing, Anna


I noticed this kit says nothing about soda ash or another acid treatment to make the dyes set. It that because they added something to the premixed dyes?
Yep that’s exactly right. I honestly think they added it to the dye powder so you don’t have to do any presoaking.
Can you still soak your shirts in soda ash before you dye or will that result in damage somehow? Asking because I have looked into this kit to use with my niece and nephew and don’t want to make a major mistake.
With this tub, you do not need soda ash. But if you’re using Dharma, definitely soak your shirts with soda ash! I suggest at least 20 minutes in the soda ash solution. The only time you need to be careful with your soda ash soak is if you have metal. If you have a zipper or buckle you don’t want to leave it in the solution too long.